Monday, June 29, 2009

Pickled Plum and Seaweed Rice


It's getting hot weather and I feel summer has just arrived. Summer is not my favorite season... I feel no energy and melted all the time. When I start feeling that, I usually eat my grandma's handmade Umeboshi (pickled plum). It increases my appetite.

INGREDIENTS:

1 1/2 rice cooker cups of rice (about 270cc)
210cc water
2 umeboshi (pickled plum), pitted and minced
2 table spoons wakame seaweed, chopped
1/2 aburaage (deep fried tofu), sliced
1 1/2 tablespoons soy sauce
2 table spoons sake

METHOD:

Wash the rice and drain well. Add 210cc water the allow the rice to sit for half an hour. Then add chopped seaweed, sliced aburaage, soy sauce and sake. Mix well. place pitted and minced umeboshi on top and turn the rice cooker on.

When the rice is done, mix the umeboshi with rice and let it steam at least 10 minutes.

Tuesday, June 23, 2009

Coconut Meringues Recipe


I love light and airy meringue. This is it!

(31 meringues)

INGREDIENTS:

Dash of salt
3 large egg whites
1/2 cup sugar
1/4 teaspoon vanilla extract
1/2 flaked sweetened coconut, toasted

METHOD:

Preheat oven to 250ºF.

Combine salt and egg whites in a large bowl; beat with mixer at medium speed until soft peaks form.

Add sugar, i tablespoon at a time, beating at high speed until stiff peaks form. Add extract; beat just until blended (do not over beat).

Gently fold in coconut. Drop by rounded table spoons, 2 inches apart, onto 2 baking sheets covered with parchment paper.

Bake at 250ºF for 1 hour until very lightly browned and almost crisp, switching baking sheets and rotating front to back halfway through baking time. Remove from oven.

Cool for 25 minutes (meringues will crisp as they cool). Sprinkle evenly with 1 table spoon cocoa.


Recipe Adapted from Cooking Light, December 2007 (some ingredients are omitted)

Sunday, June 7, 2009

Mama Tanya's Blinchiki (Russian Crepe) Recipe


Last year when my parents-in-law came to the United States to visit us, my mother-in-law was cooking almost every day and fed us with great Russian cuisine.

She showed me how to make Blinchiki which is my husband's favorite Russian crepe. I thought it called Blini, but she said that Blini is thicker than Blinchiki, and made by different dough. There are many pancakes and crapes in Russia, I find they are also called differently depending on the regions.

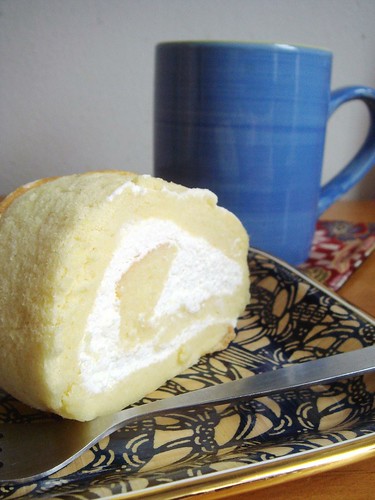
We ate Blinchiki with sour cream and sugar, or honey or jam.

It is also great with stuffing, there are plenty of variations such as boiled egg with onion, meat, sour cream with sugar, caramel for holidays etc.

(18 blinchikis, 8-9 inches diameter)

INGREDIENTS:


2 eggs
1 cup milk
2 tablespoons sugar
1 cup hot water (use room temperature water if milk and eggs are room temperature)
1 1/2 ~ 2 cups flour (2 handfuls )
1 1/2 teaspoon baking soda
1/2 teaspoon salt

METHOD:

Whisk together eggs, milk and sugar, then add hot water and whisk.

Add flour and baking soda and whisk until blend well. Add salt to taste.

~~~~~~~~~~~~~~~~~~~~~~~~~~~~~~~~~~~
If you have time, cover the mixture and keep it in the refrigerator for an hour. It gives your tender crepe. Most of the time, I don't have time for doing it, so I skip this method but it still get good result.
~~~~~~~~~~~~~~~~~~~~~~~~~~~~~~~~~~~

Heat a lightly oiled frying pan over medium high heat. Pour the batter onto the heated frying pan, using approximately 1/4 cup for each crepe. Quickly move pan around, so that batter spreads evenly, covering the whole surface with a thin layer.

Cook the crepe for about 2 minutes, until the bottom is nice brown color. Then flip with spatula, and cook the other side for about 5-10 seconds.

Repeat these steps until out of batter, stacking cooked crepes on a plate.


STUFFING VARIATIONS:


#1

boiled eggs chopped in small pieces
caramelized onions
salt and sugar to taste

#2
chicken (any meat) cooked and cut in small pieces
caramelized onions
salt to taste

#3
sour cream
sugar

#4
cottage cheese
chopped nuts
sugar

#5

caramel (for holidays)>> Recipe

Meal Diary:May Review


Sunday, May 31, 2009

Cold Salsa Pasta Recipe


It is getting good season for cold pasta. I like it for hot day's lunch. It is very light and refreshing.

This time I used left over hand made salsa from the other night's tacos dinner. All I had to do was cook pasta, that's so simple and easy. I used Spaghetti but Capellini may suite better for this recipe.

INGREDIENTS:

1/2 pound pasta
1 1/2 cups salsa

METHOD:

Boil pasta in the salted boiled water 1 minute longer than the cooking instructions for the pasta.

Drain and wash in the cold water. Drain water well.

In the large bowel, add salsa and pasta, and toss until evenly coated.

Tuesday, May 26, 2009

Grilled Blue Cheese Hamburger


After several times of blue cheese salad, the left over crumbed blue cheese was in my fridge for a while. When I was making hamburger for weekend lunch I was thinking of the left over blue cheese how to clean up, then I remember the blue cheese hamburger's menu at restaurant that I was curious and never tried. So I grabbed the blue cheese from the fridge and mixed with half of the meat mixture, I kept the other half as plane, just in case when it doesn't work.

For one hamburger meat mixture, added 1 to 1 1/2 tablespoons crumbed blue cheese and mixed well. Then grilled as usual about 7-10 minutes. When it out of oven, the cheese was melting out from meat and looked so tasty. Yes, it was tasty! I liked it, and also good to have choices, blue cheese or with American cheese. Actually, I made it smaller than regular size of hamburger, so I could enjoy both!

Friday, May 22, 2009

Kaiser Roll


Kaiser roll is one of the breads that I wanted to bake for long time. The only thing stopping me was that I don't own the kaiser stamp to make the unique shape of the dough. But I've read an article saying that traditionally kaiser roll was shaped by folding. So I realized that I don't need the stamp to make it! Unfortunately the article doesnt' have any illustrations how to do it. I used my imagination, pictured that flower looking round shape in my head and tried to shape it. It turned out OK, pretty close that I imagined, may be little more practice brings nicer shape!

Wednesday, May 20, 2009

Simple Homemade Mayonnaise Recipe


According to the nutrition facts, 1 table spoon mayonnaise is 100 calories and 99% is fat! If you make it yourself, you'll see it why... In spite of the nutrition facts, I like mayo for cooking, not a lot, it brings mild flavor to fish, meat or salad.

The good thing of handmade mayo is that you can adjust oil as you like. Vegetable oil is basic, olive oil is something special. Once you start eating vegetable sticks with this mayo, you can't stop eating! No need for fancy dip any more.

INGREDIENTS:


1 egg yolk
1 teaspoon Dijon mustard
1/2 teaspoon salt
1/8 teaspoon pepper
1 tablespoon lemon juice or white vinegar
2/3 cup vegetable oil or salad oil

METHOD:


In the small bawl, whisk together york, Dijon mustard, salt and pepper. Add 1/2 tablespoon lemon juice and beat until very think and pale yellow.

Add 1 tablespoon oil slowly, drop by drop, whisking constantly until mixture begins to thicken. Repeat this step until finish remaining oil.

Add remaining 1/2 table spoon lemon juice and whisk to blend.

Cover and refrigerate until needed. Do not keep longer than 1 week.

NOTE:

The egg yolk in this recipe is not cooked, which may be of concern if salmonella is a problem in your area.

Monday, May 18, 2009

Strawberry Bread Recipe


When I found this seasonal recipe online, I was so excited to make it. I found this strawberry bread has to be rested for a day or two days, otherwise you don't get the right texture. I tasted first, right after the bread came out of oven, it was kind of rough and I didn't like that much. So I wrap with plastic and let it rest for a couple days. Then tried it again. It was amazing! The only thing is the color of strawberries, as you see it, not pretty... like other strawberry pastries.

It is very good with tea in the afternoon.

INGREDIENTS:

2 large eggs
1/2 cup vegetable oil
1 cup sugar
1 1/2 cups all-purpose flour
1/2 teaspoon baking soda
1/4 teaspoon salt
1 1/2 cups strawberries, hulled and thinly sliced.
1/2 teaspoon grated orange rind

METHOD:

Preheat oven to 350ºF.

In a mixing bowl, beat the eggs until light and fluffy, add oil and beat until blended. Beat in the sugar.

In a separate bowl, sift together the flour, baking soda, and salt.

Beat all but about 2 tablespoons of the dry mixture into the egg-oil mixture. Add the strawberries to the remaining dry mixture and toss to coat the berries well. Fold this mixture and the orange rind into the batter.

Spoon batter in the greased loaf pan.

Bake until the loaves are nicely browned and inserted toothpick in the center comes out clean, 60 to 70 minutes. Transfer the pans to wire racks and cool 30 minutes. Run a knife around the edges of the pans and carefully remove the loaves. Return loaves to the racks to cool completely.


Recipe Adapted from gingersfoodieblog

Wednesday, May 13, 2009

Apple Compote Recipe


Apples is a kind of fruits that I always keep some at home. But when seasonal fruits come out, such as strawberry at this moment, suddenly apples are left in the basket untouched for weeks. When I had two apples left and were about going to bad, I found such a easy and simple way to store them.

INGREDIENTS:

2 apples, peeled, cored and sliced
2 cups water
1/3 cup sugar

METHOD:


Place sugar and water in the medium saucepan, heat and bring it to boil.

Add apple slices into boiling water. Cook until tender about 10 minutes.

Remove from heat and let it cool. Keep it in the refrigerator.

VARIATION:

Add a few cloves into the boiling water for different flavor.


I had several slices of this apple compote with plain yogurt in the morning, it was really good, fresh and tasty.


Recipe Adapted from Give Recipe

Sunday, May 10, 2009

Orange Peel Muffin


It was so flavorful, and tasty. If I made successful orange marmalade jam, this muffin wouldn't come up in my kitchen.

I was making orange marmalade jam as my first try ever. But I could not make it right, the mixture had never got thicken. It turned out like an orange peel candy (with syrup). Orange peel was tasty as it was, but I love jelly of the marmalade jam, not in the syrup... Good thing was that I made it from only three oranges. so it's about 1 1/2 cup. I could find the use of it.

Chopped all the peel and mixed with muffin mixture (much less sugar used) and baked it. While it hot, brushed syrup over the muffins, all of it!

Saturday, May 9, 2009

Strawberry Jam Recipe


Strawberry season is arrived (in California). I can't stop myself to grab one or two packages of strawberries whenever I go to super market. I make strawberry jam once or twice during the season. This is very simple and basic, but it's the best!

INGREDIENTS:

2 lb hulled strawberries, wash and dry gently
2 cups sugar (40-50% of strawberries)
1 lemon juice

METHOD:

Place the strawberries, sugar and lemon juice in a large saucepan and leave it for a night or at least 2-3 hours until the sugar dissolves and strawberry's juice coming out.

Heat the sauce pan and boil the mixture rapidly for 10-15 minutes, stirring occasionally and skim off foam as needed.

Once you think it might be ready, do wrinkle test and remove the sauce pan from heat and pour into the sterilized jars.

NOTE:

"Wrinkle test" is introduced by many cookbooks to see if the jam has set. When you start heating the mixture, set some saucers in the freezer, when you think the jam might be ready, spooning the mixture onto the cold saucer, leave to cool for a minute. Then push the mixture with a finger, the top should wrinkle. If it wrinkles only slightly, heat the sauce pan and cook for a couple minutes more, then test it again.

Meal Diary: April Review


Sunday, April 19, 2009

Condensed Milk Caramel Recipes


This is one of my husband's recipes. We use it for spreading toast, stuffing for crape. You will find soft and creamy caramel from this recipe that you have never tried. If you like thicker and darker one, boil additional an hour.

INGREDIENT:


sweetened condensed milk can(s)

METHOD:


Remove the label from can(s) and place it in the medium size of pod. Cover with water, so water is 2-3 inch above the can(s). Bring it to boil and boil steadily for 2 hours. Make sure that can(s) are always covered with water. After time is up, remove from water and Let it cool.

NOTE:

Use UNOPENED can, DO NOT OPEN while it hot otherwise it's exploded.

Friday, April 17, 2009

Carrot and Wakame Salad


When you want to one more light side dish, this is very useful. Carrot and dried wakame, I have both ingredients at home most of the time. Mix thin sliced carrots with soaked and drained wakame. Add your favorite sesame dressing and toss to coat.

Thursday, April 16, 2009

Coconut Cupcakes with Coconut Frosting Recipe


This coconut flavorful light texture cupcake changed my coconut sweets prejudice! I thought coconut sweets such as coconut chocolate, coconut cookies and coconut cake were too sweet but no coconut flavor, or too much stuffed sweetened desiccated coconut and felt like just eating sweetened coconut which was not pleasant. That kind of negative thought made me stay away from coconut sweets cooking. But one day I promised to my husband to make some coconut sweets. As coconut sweets lover, he insisted that we should have more coconut sweets at home. I knew it was unfair of me cooking everything what I wanted to eat and not to make what he liked. So I agreed with his request and started trying to find and develop coconut sweets recipes.

(6 cupcakes)

INGREDIENTS:


--- cupcake ---
1/4 cup (1/2 stick) unsalted butter, room temperature
1/3 cup sugar
1 egg, room temperature
1/3 cup canned coconut milk
1/3 teaspoon vanilla extract
2/3 cup flour
1/3 teaspoon salt
1/3 teaspoon baking powder
3 tablespoons sweetened desiccated coconut

--- frosting ---
1/3 stick unsalted butter, room temperature
1/3 package cream cheese, room temperature
1/4 cup of powdered sugar
2 tablespoons sweetened desiccated coconut

METHOD:

--- cupcake ---
Preheat oven to 350ºF.

Cream the butter until light and fluffy. Add sugar and cream till light and fluffy again. Add egg, beating for 30 seconds each to ensure mixing.

Combine the flour, salt, and baking powder in one bowl.

In another add well shaken coconut milk and a teaspoon of vanilla. Add 1/3 of the dry ingredients and mix, then add 1/2 of the wet ingredients. Continue alternating with the wet and dry mixtures, ending with the dry. Stop mixing once just as the ingredients become incorporated; do not over beat.

Fold in the coconut. Scoop into cupcake papers about one half to three-quarters of the way full.

Bake for 18-22 minutes or until a toothpick inserted into the center of the cupcake comes out clean. Allow the cupcakes to cool for a minute or two in the pan, then transfer to a wire rack to cool completely.

--- frosting ---
Cream the butter and cream cheese together, about 3 minutes. Scraped down the sides and bottom.

Slowly add the powdered sugar, taste as you go adding more sugar until you have reached the desired sweetness.

Fold in the coconut. Spread onto cooled cupcakes. Sprinkle on a bit of extra shredded coconut on top and serve.


Recipe adapted from Simply Recipes

Wednesday, April 15, 2009

Bartlett Pear, Blue Cheese and Watercress Salad with Maple Dressing


This is a very fruity refreshing tasty salad. I was wondering what to do with two ripe pears. It smelled just good, I could bite and finish it but I wanted to make a savory dish out of it. When I was looking for a pear recipe over the Internet, I found that pear and blue cheese are very popular combination. Then I came across Real Simple's "Arugula and Pear Salad With Maple Vinaigrette". Looking at ingredients gave me already tasty smile, I thought it gotta be good!

I use what I had in my fridge, substitute watercress for arugula, balsamic vinegar for red wine vinegar from original recipe.

(4 servings)

INGREDIENTS:

-- dressing ---
1 tablespoon maple syrup
1 teaspoon Dijon mustard
1 tablespoon balsamic vinegar
1/4 teaspoon kosher salt
1/8 teaspoon black pepper
2 tablespoons extra-virgin olive oil

-- salad ---
1 bunch of watercress
1/2 cup crumbled Gorgonzola
1-2 Bartlett pears, peeled and thinly sliced

METHOD:

In a small bowl, whisk together the dressing ingredients except oil. Whisking constantly, slowly add the oil; set aside.

Arrange the watercress on individual plates and top with the pear and cheese. Drizzle with the dressing.


Recipe adapted from Real Simple

Tuesday, April 14, 2009

Pig's feet!


This beautiful dish is made by my husband. When he found fresh pig's feet at supermarket, he graved one package and asked me with his shinning eyes, "Do you know how to cook pig's feet?", I said "No". I don't have that much sophisticated meat knowledge. In fact, I never bought meat with bones before, my husband thought me how to cook soup from boned meat which is really tasty and now I do it all the time.

So, he told me how he and his family love pig's feet in Russia. His mom and grand mom make "meat in jelly" out of pig feet. You can just eat the thin sliced jelly with Russian mustard, or place the slice on the brown bread and eat. I imagined it may be something like terrine or pate. But in my mind, it is not the dish you make it at home... I couldn't say that I can make it for him. But he said that he can make it! so we bought one package of pig's feet to try.

He explained me it should be something like this cooking process. Boil pig's feet with water for hours, skim as necessary. Once bones come out easily, it's done. Salt and pepper to taste, add dill weed. Cut pig's feet in small pieces without bones. Pour all of them in the container and cool it in the fridge until it becomes firm. Shave the fat on top of it and ready to serve.

He did almost as he imagined, just we didn't have enough meat, so he added cooked potato and carrot which was very good combination and tasty.

I also love the fact pig's feet contain a lot of collagen which helps body retain moisture. I remember my mother-in-law's face. Yeah she has a beautiful skin as her age, may be this kind of natural collagen helps my skin too!

There is a Japanese soul food restaurant. Most of their menus contain pig's feet, we should go there to check out pig's feet dishes. The restaurant called Hakata Tonton.

Monday, April 13, 2009

Diced Beef and Potato with Soy Sauce Mustard Recipe


I made this dish with left over beef to add one more dish for dinner. Just a quarter pound of beef and two potatoes. It was so good and I found that could be a main. But for now, I note as I made it small potion.

INGREDIENTS:


1/4 lb of beef, cut into 1/2-inch dice
2 potatoes, cut into 1/2-inch dice
1 tablespoon butter
*1 teaspoon soy sauce
*1 teaspoon mirin
*1 teaspoon sake
*1 teaspoon sugar
1 teaspoon dijon mustard
(optional) dill weed

METHOD:

Heat 1 tablespoon oil in a medium pan on medium high heat.

In the small bowel, mix * ingredients and set aside.

Place diced beef into the pan and cook half way through and take it out to the plate, set aside.

In the same pan, melt the butter and add diced potato, cook about 6-8 minutes.

After potatoes are cooked, add beef and mixed ingredients. Stir gently about 3 minutes, then add dijon mustard right before finish. Serve immediately.

Saturday, April 11, 2009

Bow-Loo


This is the kitchen tool I really want to own. I looked for it over the internet but I couldn't find it in the United States. It's a hot sand maker. When my brother and I was small, my mom made ham and cheese Bow-Loo sand almost every day. It was our favorite. My sister-in-law told me that my brother own one, I'm so jealous! I know there are so many hot sand makers in the market here, but I just want to this particular one... design looks nice and compact.

photo from marve

Friday, April 10, 2009

Meal Diary: March Review


Sesame Ginger Dressing Recipe


This dressing is based on my friend's sesame dressing recipe. Whenever my husband and I went to her place to eat, she prepared salad with the dressing. We loved it so much and we knew that was her handmade, so I asked her to share the recipe and she kindly did. After making it several times, I adjusted the amount of ingredients (to easy to remember) and added ginger which is one of my favorite ingredients and goes really good with soy sauce and sesame.

INGREDIENTS:


1/4 onion, coarsely chopped
1/4 carrot, coarsely chopped
1 piece of ginger (about thumb size), coarsely chopped
1/2 garlic
3 tablespoons sesame
3 tablespoons sugar
1/4 cup vinegar
1/4 cup soy sauce
3/4 cup vegetable oil


METHOD:


Place dry ingredients in food processor, and process 30 seconds.

Add remaining liquid ingredients and process 30 seconds.

Thursday, March 12, 2009

Cranberry Banana Muffin Recipe


This is a variation of Cranberry Banana Cake, Ingredients are used in half for 6-8 muffin cups and shorten baking time 1 hour 10 minutes to 45 minutes. Very often, I like making half a portion especially I don't have that much time. It's quick to prepare and muffins are baking faster than a loaf.

INGREDIENTS:

1/2 cup sugar
1/4 cup butter or margarine, softened
1 mashed banana
2 tablespoons milk
1 egg
1 cup flour
1 teaspoons baking powder
1/4 cup chopped walnuts
3/4 cups coarsely chopped fresh or frozen cranberries

METHOD:

Preheat oven to 350ºF.

Mix sugar and butter together in a medium mixing bowl until completely blended.

Add banana, milk and egg, mixing well. Add dry ingredients, mixing just until moist. Stir in nuts and cranberries. Spoon batter in muffin cups or greased muffin pan.

Bake for 45 minutes or until a toothpick inserted into the center of the muffin comes out clean. Remove from pan and cool.

Monday, March 9, 2009

White Fish Fritter Recipe


It was nice weather last Saturday. My husband and I went to Prospect Park for walking. It was kind of good feeling of coming spring. We stopped by fish market and grabbed a pound of white fish for our late lunch -fish and chips with bottles of beers! We came up with this lunch idea when we were walking. Yes, it was little bit hot and thirsty after long time walking.

INGREDIENTS:


1 lb white fish fillet, cut in stripes
1 egg
1/4 cup water
2/1 cup flour
1/2 teaspoon baking powder
2 teaspoons olive oil
salt and pepper to taste
lemon (optional)

Variations:

Either herb or curry powder gives fish fritters unique flavor. It can be added to the batter before dipping the fish.
* 1 tablespoon herb
* 1 teaspoon curry powder

METHOD:

Salt and pepper to the fish fillet cut in stripes and set aside.

In the bowl, mix egg and water.

Add flour, baking powder and mix to a smooth batter, then add olive oil.

Dip pieces of fish in mixture and fry in a large frying pan until golden on both sides.

Drain on paper towel and serve with lemon (optional).

Salt to taste if you desire.

Friday, March 6, 2009

Mini Apple Tart Recipe


This is a variation of Press-Crust Pear Tart. I liked this cookie-taste crust, so I wanted to discover more variations. This time, I used half of ingredients from original recipe and made mini tarts using foil cups. It turned out as good as pear's.

(6 foil cups)

INGREDIENTS:


1/4 cup (1/2 stick) unsalted butter
1/2 cup all-purpose flour, plus more for your fingers
1/4 cup sugar, plus 2 teaspoons
1/2 large egg
1 1/2 apples, peeled,cored and thin sliced about a inch width
2 teaspoons ground cinnamon
2 tablespoons apricot jam
1/2 tablespoon fresh lemon juice

METHOD:

Heat oven to 350° F.

Cream the butter and 1/4 cup sugar at high speed in the large bowl of an electric mixer. Lower speed to medium, add the egg, and beat until incorporated. Gradually add the shifted flour until fully incorporated. The dough will be very soft. Push the dough into the foil cups with floured fingers to form an even crust. Arrange the apples, top to bottom. Sprinkle with the cinnamon and the remaining sugar. Bake until the crust is golden brown, about 30-45 minutes; let cool.

Heat the apricot jam and lemon juice in a small saucepan over medium-low heat, mixing until combined. Remove from heat and brush gently over the entire tart.

Meal Diary: February Review


Thursday, March 5, 2009

Quick Spinach and Egg Mini Casserole Recipe


This easy mini casserole is made from simple ingredients. I like it for weekend breakfast or brunch. You can do some variations with ham or bacon as you like!

(2 servings)

INGREDIENTS:


1 bunch of spinach, about 1/2 lb
1/2 cup grated cheese, recommended Gruyere or Emmental
2 eggs
3 tablespoon heavy whipping cream
salt and pepper to taste

METHOD:

Heat oven to 400° F.

Steam the bunch of spinach about a couple of minute and squeeze tight then cut it in an inch length.

Grate your favorite cheese about a 1/2 cup.

Place the half potion of spinach in the each mini casseroles and salt and pepper. Add the half potion of cheese on top of the spinach, then drop the egg into the each mini casserole. Add one more spinach and cheese layer. Pour 1 1/2 tablespoon heavy whipping cream.

Bring it to the oven for 8-9 minutes. Serve immediately.


Recipe adapted from Basque no satoutsubo

Wednesday, February 25, 2009

Pressed-Crust Pear Tart Recipe


I always wanted to make a tart dough from scratch, but it seemed so complicated and I never did until this pressed-crust pear tart. This is a great recipe for someone like me. You don't have to worry about the dough and the filling making at same time. No need to refrigerate the dough like all other basic tart dough. I don't even have a tart pan..., but it still works! The crust came out taste like sweet cookie. It's easy and very simple.

(8 servings)
Recommended pan: 14-inch rectangular tart pan or 10-inch round tart pan

INGREDIENTS:

1/2 cup (1 stick) unsalted butter, plus more for the pan, at room temperature
1 cup all-purpose flour, plus more for your fingers
1/2 cup sugar, plus 11/2 tablespoons
1 large egg
2 to 3 Bosc pears, peeled, halved, and cored
1 1/2 teaspoons ground cinnamon
1/4 cup apricot jam
1 tablespoon fresh lemon juice
1 Whipped cream (optional)

METHOD:

Heat oven to 350° F. Butter a 14-inch rectangular tart pan and set aside.

Cream the butter and 1/2 cup sugar at high speed in the large bowl of an electric mixer. Lower speed to medium, add the egg, and beat until incorporated. Gradually add the shifted flour until fully incorporated. The dough will be very soft. Push the dough into the pan with floured fingers to form an even crust. Arrange the pear halves, top to bottom, cut-side down. Sprinkle with the cinnamon and the remaining sugar. Bake until the crust is golden brown, about 45 minutes; let cool.

Heat the apricot jam and lemon juice in a small saucepan over medium-low heat, mixing until combined. Remove from heat and brush gently over the entire tart. Serve with the whipped cream, if desired.

Recipe adapted from RealSimple

VARIATION:
Substitute pears to apples

Saturday, February 21, 2009

Orange Bavarois Recipe


I love bavarois, I have 2 bavarois recipes:strawberry and banana. Orange bavarois was something new for me. When I came across this recipe, I fell in love with an idea to use whole orange peel as a cup. I was so happy that I had three oranges left in my kithcen to try it right away.

It came out so pretty and tasty, would be a great dessert for entertaining.

INGREDIENTS:

2-3 oranges
3/4 cup orange juice
1 tablespoon lemon juice
3 2/3 tablespoon sugar
1 teaspoon powdered gelatin
2 teaspoons liquor
1/3 cup heavy whipping cream

METHOD:

Cut the oranges horizontally 1" from the top and set aside, the top part used as a lid later. Slice a very thin disk from the bottom so they rest flat.

With a pairing knife, cut around the inside rim of the orange removing the orange sections then squeeze the juice.

Place in a small pan with the orange juice, lemon juice and sugar. Bring to boil and remove the heat. Add powdered gelatin and liquor and mix well. Let it cool over the ice bath until the mixture thickens.

In the bowel, whisk the whipping cream as thick as the mixture is. (Don't make it too thick! The mixture and the whipped cream should be the same thickness.) Then pour the gelatin mixture into the whipped cream bowel and gently mix them.

Spoon the mixture into the orange peel cups and place the lids. Refrigerate for at least 2 hours to firm it.


Recipe adapted from Michiko Matsuda's Chic & Swift Recipes

Stuffed Rainbow Chard Rolls


I had never seen this vegetanble, rainbow chard. When I found it in the box from Urban Organic, I was shocked... What is it? The pink stalks are beautiful, but I didn't know if it's edible.

I opened the encyclopedia to check on this vegetable. What I found was that is also known as Swiss chard which has white stalks, is related to the beet and is grown for its edible stalks and leaves. Leaves are prepared much like spinach, and stalks are prepared like celery. When tender and fresh, the raw leaves are delicious in salads. Cooked chard is good warm or cold.

This is good enough to start cooking. Leaves are much bigger than spinach, so I decided to use it substitute of cabbage of cabbage rolls. For stuffing, I used ground beef, chopped pork sausage, chopped onion and boiled brown rice. Flavored it with little bit of cumin powder. Added salt and pepper for taste.

The pretty stalks were sliced and sauteed with garlic olive oil and served with balsamic vinegar.


It was nice dinner and I liked it. Next time, I'd like to try it as a salad.

Friday, February 20, 2009

Takoyaki Lunch Party


"Takoyaki (literally fried or baked octopus) is a popular Japanese dumpling made of batter, diced or whole baby octopus, tempura scraps (tenkasu), pickled ginger, and green onion, topped with okonomiyaki sauce, green laver (aonori), mayonnaise, and katsuobushi (fish shavings), originating from Osaka. A takoyaki pan is typically made of cast iron with half-spherical molds. The heavy iron evenly heats the takoyaki. Commercial gas-fueled takoyaki cookers are used at Japanese festivals or by street vendors. For home use, electric versions resembling a hotplate; stovetop versions are also available." by Wikipedia

As Takoyaki is from west party of Japan, I believe western people love Takoyaki much more than eastern people. Because I met many people in New York who own a Takoyaki Pan, they are all from west! I am from east, and so my family is. When I told my girl friend that I never made Takoyaki at home, she came up with Takoyaki lunch party plan.

She brought an electric Takoyaki pan and invite one more girl from western part of Japan. This is my first time making Takoyaki at home, however I was just waching what gilrs were doing it. It was so quick! One person pours the butter and the other places the diced octopus and other ingredients, my friends' favorite ingredient boiled quail's egg as well. Then flip them one by one with sharp-pointed stick to make it round shape. The process was less than 10 minutes. Topping were special sauce for Takoyaki, mayonnaise and katusobushi. Beer was the perfect muching drink.

The fun part is not only eating but also making it! Hope I can more prticipate making part next time.

Friday, February 13, 2009

"Beard on Bread" Project


When I started baking bread in Japan, about 9 years ago, my best friend gave me a book, Japanese edition of "Beard on Bread" by James Beard. At that time, I didn't know about James Beard. I didn't know that the book is the bible for home bakery. All I needed was step by step instructions with pictures, this book was too advanced to me. I never tried any breads from the book and forgot about it for long long time until I found it in the closet last week. Actually I was surprised that I brought it from Japan.

It was kind of exciting that I found this book. Now I know who's James Beard. I didn't know I have one of his book. I see so many interesting bread recipes in the book, I started feeling that I would like to check the original English edition. So I borrowed it from library.

I love this book! It's an original edition printed in 70s. To own one, I have options to buy paperback one(new) or hard cover one(used). After the feeling of special connection to this book, I definitely go for the hard cover.

Now I'm thinking to make all the breads from the book!
I call it "Beard on Bread" Project.

From Introduction, the part I'm very attracted.
"... I have not attempted to write a comprehensive history of bread and its religious significance, or to give a complete roundup of international baking... What I am presenting here is what I consider the besot of breads I have sampled from all over -- and I have worked out the recipes so that they can be made in the average American kitchen....."

Tuesday, February 10, 2009

My Favorite Utensil


A bamboo sieve is one of my favorite utensils. I just got three of them from my friend who came back to New York from Japan. I haven't had them long time. Since I started cooking every day, I missed it so much! I think vegetables are quickly dried out after rinsed on the bamboo sieve. Tofu or other delicate ingredients are safe to drain with this no to brake the shape. Actually, It is difficult to keep it dry in high humidity place such as Japan. I remember that when I was using it in Japan, sometimes I found mold spots on it. But not here in New York -I hope!

Sunday, February 8, 2009

Meal Diary: January Review


Vegetable Stock Recipe


This is very my way to make vegetable stock, I've discovered it since I started cooking 3 meals a day at home. I realized that there are so much waste from vegetables such as peels of carrot, potato and celery, fresh herbs stem, onion skin, mushroom stalk, unusable tiny garlic, and so on. I thought they should make one more stop before going to a trash can. Is it too cheap? I just don't want to waste food that still eatable or flavorful.

Collecting ingredients is every day's routine. When you are working with vegetables, keep the waste on the side. I usually keep everything together in the big Ziploc bag in the freezer. Once the bag is full, it's time to make your own vegetable stock!

INGREDIENTS:

1 bag (about 11"x10" Ziploc bag) of vegetable waste, such as onions, garlic, leeks, shallots, celery, carrots, potaots, mushrooms, tomatoes, broccoli stems, and so on.
4 bay leaves
8-10 whole black peppers
8-10 cups of water

METHOD:

Place all the ingredients in a large pot and bring it to boil.

Reduce the heat and simmer for 1 hour.

Strain the broth through a sieve.

Keep it in refrigerator, I usually finish it in a week.

Sunday, January 18, 2009

Non Cooking Japanese Dinner

dinner: una-don (grilled eel on white rice), poached egg miso soup, tofu, kamaboko, sake

snack: almond merengue, capuchino


breakfast: bread, bacon, fried egg, coffee

Saturday, January 17, 2009

Fruits Plate

My husband brought a lot of fruits for me to feel better, and prepared pretty fruits plate. Today, I felt much better and had enough appetite.

dinner: shrimp and bacon pasta with white sauce
dessert: chocolate cake

lunch: chicken curry and crispy herbs rice

breakfast: fruits plate -apple, grape, pear, cherry,

Friday, January 16, 2009

Sick Day Skipped Meals

I was sick since noon till end of the day. I felt something really bad thing hit me, I had no appetite at all, skipped lunch and dinner.

breakfast: blinchiki (russian crape) with honey

Thursday, January 15, 2009

Got Street Food Flavor

For my lunch, I tried something new. Used spices from "Hot Spicy Shrimp with Coriander" that I cooked a couple days ago from the Middle East Food cookbook. Applied the spices (garlic, ginger, red chilli, cumin seeds and paprika) to the beef, onion, tomato and mushroom, it worked really good. By accident, I added more cumin seeds than I was going to but it turned out unexpectedly nice. This smell is exactly the one from the Middle Easter food street vendors in Manhattan. Sometime it's attractive when you are walking down on the street around lunch time. I'm happy to discover this spices mix.


dinner: Japanese style chicken curry and rice, celery and wakame salad with kamaboko, wine

lunch: middle eastern flavored sauteed beef and mushroom, couscous

breakfast: roll cake, tea

Tuesday, January 13, 2009

Chicken Soup for Cold Winter Night


dinner: chicken and potato soup, tomato, avocado, celery and sweet corn salad, fried chicken with watercress
dessert: roll cake and tea (not pictured)

lunch: fried rice, green tea


breakfast: plain yogurt with cranberry sauce, bread and egg

Monday, January 12, 2009

A Humiliating Rice Cooking Experience

I can cook perfectly fine steamed rice without rice cooker. It is a Japanese style, no salt, no oil and no drain needed, and comes out always good shape, firm and shiny. But whenever I try different way, none of recipes worked for me. It always turned out soft and mushy thing, really bad... At least, shrimp dish was good tonight. It was another Middle Eastern food challenge.


dinner: hot spicy shrimp with coriander, rice with fresh herbs, sesame and tofu's carrot salad

lunch: hotpot leftover and udon noodle

breakfast: plain yougat and apple

Sunday, January 11, 2009

Potato King

My husband is potato king. He loves potato in any ways. According to what he says, all Russian people love potato, and they prefer eating it every single day. And he continued that we eat too much rice, it's ok, but rice percentage of the meal is really high. Yes, that's right, your wife is Japanese who lives on rice, and most of the time, she is the cook at home. I like potato, bread, pasta and so on, just it's easier for me to think about rice dish for everyday meal . But I am very fair person, so I got a 5lb of potato bag to please him. Today, potato is in the every meals, and I'll try to bring it more often to the table.

dinner: salmon and potato hotpot

lunch: mushed potato, meat bolls, stuffed eggs, carrot soup, cheese cake

breakfast: hash browns, fried egg, latte